

Last updated: September 10, 2026
Key Takeaways
- A flat, accessible 800-square-foot patch with no tear-out is one sod installation cost project.
- Even a modest 1 to 2 inches of topdressing over a large area adds material and labor.
- A 2,500-square-foot front and back yard with rubble, clay, and slope is a different sod installation cost project with a different labor profile.
- I would also plan the sod installation cost project around a window of 1 to 2 days when someone can stay available.
Sod installation cost is usually driven less by the grass itself and more by the ground work under it: removal, grading, soil correction, access, and how quickly the crew can lay and water the turf. Want the blunt version? The real question in sod installation cost and project planning — complete guide terms is not just “How much per square foot?” but “What does this site need before sod goes down, and what will that add to the bill?” This sod installation cost and project planning — complete guide also helps you compare quotes, spot missing line items, and budget for watering, cleanup, and site prep.
Who this guide is for — and what I’m assuming you already know
This sod installation cost and project planning — complete guide is for a homeowner, landlord, or property manager who is trying to budget a sod job and decide whether a quoted price is fair. I’m assuming you already know the difference between sod and seed at a basic level, and that you have a rough idea of the area you want covered, even if it is not measured perfectly yet. No square footage? Get that first. I would not trust any quote, no matter how polished, until the area is measured in square feet or square meters and the crew has seen the site.
I’m also assuming you are dealing with a normal residential yard, not a sports field, a steep commercial embankment, or a new build with heavy construction damage. Those jobs can still use sod, but the planning changes enough that a generic price per square foot becomes a weak guide. In a yard with clay soil, compacted subgrade, irrigation already in place, or a lot of access obstacles, the prep can cost as much as the grass itself. In a yard with decent topsoil and easy machine access, the job can be much simpler. Easy? Not always.
This is not a do-it-yourself warning dressed up as advice. Small, flat areas can be feasible for many people, but once the job includes regrading, drainage correction, or over about 1,000 square feet, it is wise to consult a professional because a bad install can leave you with seams that dry out, low spots that puddle, or turf that never roots evenly. For guidance on prepared seedbeds and firm soil contact, see university extension resources such as NC State Extension and University of Florida IFAS. If that happens, the base is the culprit, not the sod variety. In those cases, I would want a contractor who can explain grading, soil depth, and irrigation in plain language.
For reference, the National Turfgrass Federation and many university extension programs recommend planning sod on a prepared, leveled seedbed with good soil contact rather than laying it on hard, unmodified ground. That standard matters more than the brand of grass.
How much does sod installation cost?
Sod installation cost usually lands in a broad range because two lawns with the same square footage can require very different site work. The quote often includes some mix of sod supply, delivery, labor, soil prep, grading, debris removal, and first watering guidance. A simple, accessible lawn with light prep will price very differently from a yard that needs old turf removed, drainage repaired, or soil brought in.
The clearest way to think about cost is to split it into layers:
- Sod itself: priced by the square foot, square yard, or pallet.
- Prep and labor: removal of old grass, tilling or scarifying, leveling, topsoil, and installation.
- Extras: hauling, edging, minor irrigation work, fill dirt, or compost.
If a contractor gives you one lump-sum number, ask them to break out those layers. A “cheap” quote that skips prep often becomes expensive after the lawn fails in patches and has to be fixed. A reputable quote should also state whether cleanup, delivery, and watering instructions are included.
A generic article often gets this wrong by treating sod as a flat material cost, so it is safer to consult a professional when the yard has drainage issues, grading changes, or uncertain soil depth. The same grass can perform very differently depending on soil, climate, and drainage. For example, warm-season grasses such as bermudagrass and zoysiagrass are common in hotter regions, while cool-season grasses such as Kentucky bluegrass and tall fescue are more common in colder climates. The climate does not just change what you buy; it changes how picky the site prep needs to be. In areas with hot, dry summers, a lawn laid on shallow topsoil can burn out quickly if the root zone is thin. In rainy regions, poor grading can leave the sod sitting in water.
I do not want to pretend that there is one universal “average cost” that matters everywhere. There isn’t. What matters is whether the quote reflects the actual condition of your yard. A flat, accessible 800-square-foot patch with no tear-out is one sod installation cost project. A 2,500-square-foot front and back yard with rubble, clay, and slope is a different job with a different labor profile.
If you want a reliable budget, ask for at least three numbers: sod supply, prep labor, and irrigation or drainage work. Then compare whether each quote includes delivery, topsoil depth, and cleanup. A missing line item is usually where the surprise bill hides.
What drives the price up or down?

The price moves when the site moves out of “easy install” territory. The biggest cost drivers are area, access, soil condition, slope, and water.
Area: Larger lawns can lower the per-square-foot labor rate because the crew spends less time on setup relative to output. But a larger site also increases the chance that a hidden issue, such as a drainage pocket or compacted strip, will show up.
Access: If a crew can unload pallets near the work area, the job is faster. If they have to wheel sod through a narrow side yard, around a pool, or up stairs, labor rises. A pallet of sod is heavy; machine access matters. A simple gate can change the whole quote.
Removal: Existing turf that needs to be stripped and hauled away adds both labor and disposal fees. If the old grass is full of weeds, rooted in hard clay, or mixed with stones, removal takes longer. Some crews charge separately for stump grinding or root cleanup if trees were removed.
Grading and soil correction: This is the part many homeowners underestimate. Sod needs a smooth, firm base. If the yard is rough, rutted, or sloped the wrong way, the crew may need to bring in topsoil, fill low spots, and regrade so water drains away from the house. Even a modest 1 to 2 inches of topdressing over a large area adds material and labor. A bad slope is not cosmetic; it can create standing water and root failure.
Soil type: Sandy soil drains fast and may need compost or additional organic matter to hold moisture. Heavy clay holds water, compacts easily, and can need tilling, amendment, or more careful grading. Neither is “better” by default; both just change the prep plan.
Climate and season: In hot weather, the job has to move quickly because fresh sod dries out fast. In cooler, wetter periods, too much rain can delay grading or make soil too soft to work. In some regions, dormant-season installation is common for certain grasses; in others, summer stress makes that a bad idea.
Irrigation: If there is no working irrigation system, you need a clear watering plan. Hand watering a large new sod install is possible only if someone can do it on schedule. A missing irrigation system is not always a deal-breaker, but it should be part of the planning and discussed with a contractor before work begins.
Edges and details: Curves around beds, trees, paths, and utility boxes take more cutting and waste more material than a simple rectangle. More cuts mean more labor and more seams to keep tight.
I would be suspicious of a quote that is far below the others without a clear explanation. Low bids sometimes leave out prep, topsoil, edging, cleanup, or the first critical watering instructions.
What do I need to plan before calling a contractor?
You need a measured area, a clear idea of the current site condition, and a short list of what you want the finished lawn to do. That sounds simple, but it is what separates a usable quote from a vague estimate.
Start with the area. Measure length and width for each section of lawn, then subtract patios, beds, driveways, and other hardscape. If the yard has curves, break it into rectangles and triangles and round up. Contractors often quote with a waste factor because sod comes in pieces and the edges get trimmed. A modest waste allowance is normal; a huge one should be explained.
Next, look at what is already there. Ask:
– Is there existing turf to remove?
– Is the soil soft or compacted?
– Does water already pool anywhere after rain?
– Are there tree roots, construction debris, or buried obstacles?
– Is there a slope toward the house, sidewalk, or neighbor’s property?
Then decide how finished you want the lawn to look on day one. A “good enough for family use” lawn and a “front-yard curb appeal” lawn are not the same. A front yard with visible seams and uneven elevation will look unfinished even if the sod is healthy.
The site condition matters even more than the turf type in many cases. For example, a thin layer of new sod on compacted fill is a short-lived fix. Proper soil contact is the issue. Sod roots need contact with moist, firm soil so they can knit into the ground. If there is a gap under the sod, the roots struggle and the turf dries in sections.
Because of that, I would also plan the project around a window of 1 to 2 days when someone can stay available. Fresh sod cannot be left alone for long on installation day, and the first watering period is when most mistakes show up. If you are going out of town, that is the wrong week to schedule it.
When you call contractors, ask them to estimate from photos and a site visit, and ask what they need from you: access, water, parking, or utility marking. That sounds basic, but good planning reduces delays and avoids extra labor charges.
How is sod installed, step by step?
Sod is installed by preparing a level base, laying tight seams, and watering immediately so the roots can begin to bond with the soil. The details matter because a good-looking first day can still fail if the prep is wrong.
- Mark and measure the area precisely. Lay out the lawn in square feet or square meters and note beds, slopes, and obstacles. Verify that the total area matches the amount of sod ordered, plus a small waste margin for cuts. A mismatch between the measured site and the pallet count is the problem here, and it usually means either material shortage or extra leftover cost.
- Remove old grass, weeds, rocks, and debris. Strip existing turf if needed, and clear stones larger than about 1 inch, sticks, and construction waste. Verify that the surface is free of hard clumps and buried debris. Leaving roots, rubble, or weed mats in place causes bumps and weak seams.
- Correct grade and drainage. Shape the surface so water moves away from buildings and does not collect in low spots. A common target is a gentle fall away from structures, not a flat basin. Verify that no area holds visible water after a hose test or rain. A dip near the foundation or a hollow that stays wet will rot roots.
- Loosen and condition the top layer of soil. Tilling, scarifying, or raking the top 2 to 4 inches can improve root contact; on some sites, compost or screened topsoil is added. Verify that the surface is crumbly, not hard as concrete, and that any added material is blended evenly. A shiny compacted crust under the sod blocks rooting.
- Set edges and create clean borders. Cut beds, walkways, and hardscape lines before laying turf. Verify that edges are straight or smoothly curved, with no overhang into beds. Sloppy edges dry out first and make the job look rushed.
- Lay sod in a staggered pattern. Start along a straight edge and fit the pieces tightly like brickwork, staggering seams so they do not line up. Keep seams snug, with no visible gaps wider than about 1/2 inch. Long continuous seams are the problem, since they open as the sod shrinks or settles.
- Trim carefully around obstacles. Use a sharp knife to fit around sprinkler heads, trees, corners, and utilities. Verify that sprinkler heads stay exposed and that no sod covers access points. Burying heads or leaving large slivers makes those areas dry out and die.
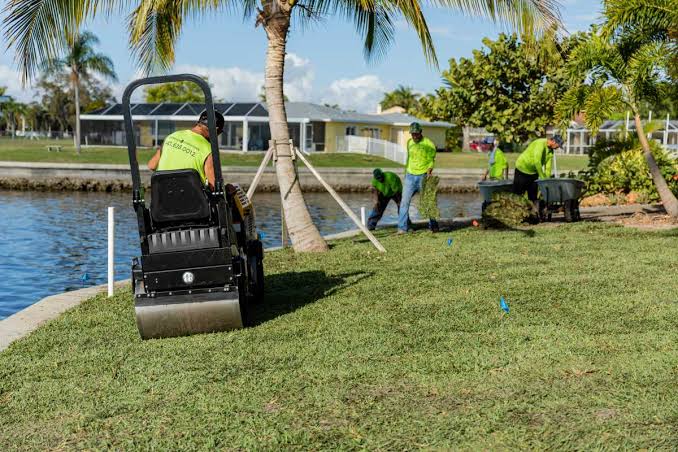
- Roll or press the sod into contact with the soil. A lawn roller or firm tamping helps eliminate air pockets. Verify that the sod feels flat and bonded, not spongy or floating. Trapped air or loose pieces dry faster and root unevenly.
- Water immediately and deeply enough to moisten the base. Water soon after installation, not hours later, and continue with a frequent schedule during the first 1 to 2 weeks depending on heat and wind. Verify that the sod and the soil beneath it are moist, not puddled. Dry seams, curled edges, or soggy spots from overwatering are the warning signs.
That sequence is the backbone of the job, but it is not just a checklist. The details decide whether the lawn roots in a few weeks or struggles for months. One overlooked patch of compacted soil can create a dead strip that is obvious by midsummer.
How long does a sod project take, and what should the finished lawn look like?
A typical residential sod project can take one day for installation or several days if there is significant removal, grading, or drainage work. The schedule depends more on prep than on the sod-laying itself.
For a simple, small yard with access and minimal prep, the crew may strip, grade, and lay sod in the same day. For a larger or messier site, one day may be spent on removal and grading, then another on installation. If topsoil needs to be delivered or irrigation repaired, the project can stretch further. Weather can also push the schedule. A wet clay yard may be too soft to grade cleanly after rain, and hot, windy conditions compress the watering window.
The first visual check is simple: the lawn should look level, tight, and deliberate. You should not see major humps, troughs, or long open seams. Edges should meet hard surfaces cleanly. There should be no standing water after irrigation or a normal rain. If the sod looks flat but springy, or if you can lift corners easily, the base is not firm enough.
A healthy finished job also has the right feel underfoot. It should not squish like a sponge or crunch on dry dust. On day one, some seams may be visible, but they should not be gaping. Within a few weeks, if watering and weather cooperate, the grass should begin to knit into the soil. The exact rooting timeline depends on grass type, temperature, and moisture, so I would not promise a fixed number of days. Warm soil usually speeds rooting; cold soil slows it down.
One thing a generic article often misses is timing with your calendar. If you have pets, kids, or outdoor furniture, plan for a period of restricted use. Heavy foot traffic too early can shift seams and bruise the sod before it has rooted. If the lawn is part of a main entrance, you may need temporary walk paths.
The other thing people forget is cleanup. A good project does not end with turf on the ground. Excess soil, scraps, torn pieces, and packaging should be removed. If those details are ignored, the yard looks unfinished no matter how nice the grass is.
When should you stop and change the plan?
You should stop and change the plan when the site conditions make a standard sod install a poor fit. Sod is not the answer to every lawn problem, and forcing it onto the wrong base is how homeowners pay twice.
Water pools for more than 24 hours after rain: The grade is wrong or the subsoil is holding water — Fix drainage and regrade before installing sod, or the roots may suffocate.
The soil is hard enough that a screwdriver barely enters 3 to 4 inches: The ground is too compacted for good root contact — Loosen, amend, or replace the top layer before laying turf.
The yard has large patches of construction debris, buried rock, or old concrete: The surface cannot be leveled properly — Remove the debris first; otherwise the sod bridges over hard spots and fails in uneven sections.
The slope runs toward the house or a walkway: Water management is wrong — Regrade so runoff moves away from structures, or expect water damage and slippery surfaces.
There is no reliable watering plan for the first 2 weeks: New sod may dry out fast, especially in hot or windy weather — Delay the project until someone can water on schedule or the site has working irrigation.
The project includes steep banks or narrow strips under 18 inches wide: Those areas are hard to keep moist and anchor — Use a different groundcover, erosion control, or a specialist plan instead of standard sod.
The lawn must be ready for heavy use immediately: Fresh sod needs time to root — If the site must handle traffic right away, sod is the wrong tool because seams can shift and edges can lift.
You are expecting sod to fix poor soil without prep: It will not — Thin topsoil, drainage problems, and compaction still need correction, or the lawn will struggle from the start.