

Last updated: September 10, 2026
Key Takeaways
- Rake or till the top 2 to 4 inches of soil so roots can enter it.
- The soil beneath should be moist 2 to 4 inches down.
- On many lawns that is around 10 to 14 days, but the grass and weather control the timing.
- A standard roll is often around 2 feet by 5 feet, so the work moves fast once you begin.
Fresh sod gives you an instant lawn. But only on a decent base. This guide shows how to lay sod step by step for a homeowner or property manager with a flat to mildly sloped yard, decent drainage, and a fairly normal soil base. Should the site have standing water, severe shade, heavy clay that stays wet for days, or a slope steep enough to shed water and soil, the usual method needs changes before you start. In those cases, sod alone is the wrong fix until grading, drainage, or soil correction comes first.
What you need to know before you start

You can lay sod yourself when the area is already graded, you know what grass type you are buying, and you can water on the first day and for the first 2 to 3 weeks after installation. Sod is living plant material, not flooring. Leave it rolled too long, let it dry, or set it on loose soil, and the root zone struggles to knit into the ground. Ugly fast.
I’d also draw a line around who should not use this as a first-pass solution: anyone trying to cover bare fill dirt, compacted subsoil, a muddy low spot, or a lawn with more than about 25 to 30 percent of the area repeatedly ponding after rain. Those are drainage or grading problems, not “sod problems.” Skip the fix, and the sod may look green for a week, then root poorly, thin out, and fail in patches. That’s the trade-off.
Have a way to water the whole area evenly, plus a sharp utility knife or sod cutter, a straight rake, topsoil or compost for minor corrections, and enough time to install the sod the same day it arrives. A standard roll is often around 2 feet by 5 feet, so the work moves fast once you begin. And if grass species is still a guess, don’t guess; match the sod to your climate and sun exposure instead, because warm-season grasses and cool-season grasses want different windows of the year and different care patterns. See your local extension service for species selection and timing, such as the University of California Agriculture and Natural Resources or NC State Extension.
How do you prepare the ground for sod?
Clear, grade, loosen, and firm the surface first. That’s the sequence. The aim is a smooth, slightly rough bed that gives roots contact across the full underside of the sod.
- Remove old growth and debris. Strip away weeds, stones larger than about 1 inch, sticks, old turf, and construction scraps from the whole area. Confirm that the soil surface is visible everywhere and that nothing sharp or bulky is left under the new lawn. Hidden junk shows itself later when the mower hits it or the sod bridges over bumps and leaves air pockets.
- Fix the grade before you buy sod. Shape the soil so water runs away from buildings and low spots are eliminated. A common target is a gentle slope of about 1 to 2 percent away from foundations, though local grading standards vary; check the target with your municipality or a landscape professional if you are unsure. Use a long board and level or a string line. If water would still sit in a shallow bowl, stop and regrade; sod will not solve ponding. For drainage guidance, see the [EPA’s stormwater basics](https://www.epa.gov/soakuptherain/soak-rain-stormwater-basics).
- Add soil where needed. Spread 1 to 2 inches of screened topsoil or finished compost only where the surface is low or thin. Work it into the top few inches rather than leaving it as a separate layer. Make sure transitions are gradual, not lumpy. A visible ridge or trench will telegraph through the sod and dry unevenly.
- Loosen the top layer. Rake or till the top 2 to 4 inches of soil so roots can enter it. Do not deeply pulverize heavy clay into dust. Check that the surface is loose enough for a finger or screwdriver to penetrate several inches, but still firm underfoot. If your boot sinks deeply, the soil is too soft and will settle later.
- Set the final surface slightly below hardscape. Leave the soil about 1 inch below sidewalks, driveways, and edging so the sod tops out flush after it settles. Check the height at multiple edges. If the sod will sit proud of hardscape, mower wheels and water runoff will create a ragged edge later.
- Lightly firm and smooth. Use a lawn roller half full of water or simply walk the area in overlapping passes to settle loose soil. Then rake lightly to remove footprints and ridges. Make sure the surface is level enough that a 6-foot straightedge does not rock on it. If the soil still feels fluffy, the sod will sink unevenly.
- Moisten the soil, but do not saturate it. Water the prepared ground so it is damp several inches deep, not muddy. Make sure the top layer darkens and holds shape when squeezed without dripping water. If water puddles, wait; sod on mud slips, settles badly, and roots poorly.
A generic article often skips the grade work and talks only about watering. Backwards, honestly. A well-watered lawn on a bad base is still a bad lawn. I’d rather see 30 extra minutes spent on leveling than a month spent nursing seams and bare spots.
How to lay sod step by step

Lay sod in straight rows, stagger the seams, press the pieces into full contact, and water right away. The installation itself is simple; the details decide whether the lawn roots in or shrinks, gaps, and dries at the edges.
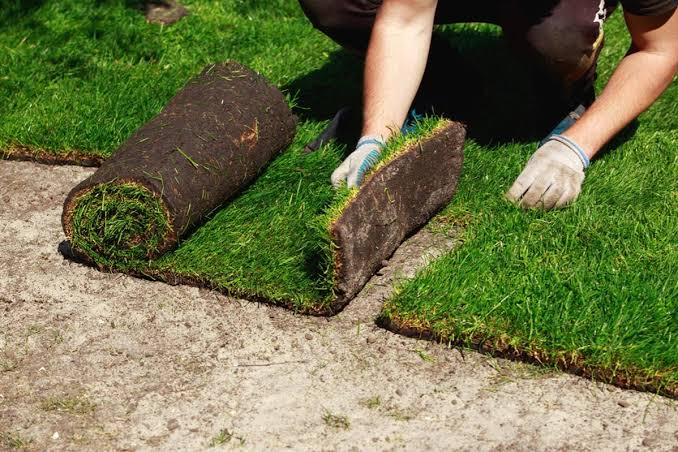
- Start along the longest straight edge. Place the first strip against a driveway, sidewalk, or straight bed line. Butt the edge tightly to the border without overlapping it. Be sure the first row is straight, because every later row follows it. One crooked starter row turns into wedge-shaped gaps that are annoying to hide later.
- Lay each piece tightly against the next. Push seams together so there are no visible gaps, but do not stretch the sod. The edges should meet like puzzle pieces, not overlap. Be sure that you cannot see soil between seams from standing height. If seams open wider than about 1/2 inch, they will dry out faster than the rest of the strip.
- Stagger the joints like brickwork. Cut the first piece of every other row in half, or by at least one-third, so seams do not line up. This is the standard pattern for a reason: it locks the surface together and reduces long weak lines. Ensure that no four corners meet in one spot. If seams stack, the lawn will separate more easily during shrinkage.
- Use a sharp knife for cuts. Trim around curves, sprinkler heads, and bed edges with a utility knife or sod knife. Make clean cuts; don’t tear the grass. Ensure the sod fits snugly around obstacles without buckling. A wrinkled piece traps air and dries unevenly.
- Press the sod into the soil. After a section is down, walk on it lightly or use a lawn roller only if the soil is firm enough not to compact badly. The purpose is root-to-soil contact. Make sure the pieces do not rock when stepped on. If a roll of sod feels springy underfoot, there is air underneath or the base is too loose.
- Keep the surface flush. If one piece sits higher than the next, trim the underside or adjust the base; do not force a thick edge down by stepping on it alone. Ensure that the lawn reads as one plane. High edges dry faster and snag mower blades.
- Finish each section with immediate watering. Water the sod right after it is laid, not at the end of the day if there is a long gap. The soil beneath should be moist 2 to 4 inches down. Check by lifting a corner of one edge only if needed: the underside should be damp, not slick with mud or dry and dusty. If the underside is dry, roots cannot bridge to the soil.
- Water the whole lawn evenly, then check the seams again. After the first watering, look for lifted corners, floating pieces, or areas where the sod shifted. Fix those immediately by pressing them back into contact. If water has made a low spot or the sod has drifted, that area needs correction before the next irrigation cycle.
The most common mistake here is treating sod like carpet and walking faster when the job gets repetitive. Speed is fine; sloppy seams are not. Should you be unsure how quickly your site is drying, consult a local extension office or lawn care professional before changing the watering schedule. A clean installation buys you a lawn that can root uniformly in roughly 2 to 3 weeks under decent conditions, while a careless one keeps advertising every seam.
What should you check after the sod is down?
Check root contact, moisture depth, seam closure, and edge stability during the first 14 days, because that is when most failures show up. The first week is about keeping the sod from drying out; the second is about keeping it alive while roots begin to bite into the soil.
For the first watering, the aim is to wet the sod and the top several inches of soil without creating runoff. After that, keep the sod consistently moist at the surface until rooting starts. In warm, dry weather, that can mean watering more than once a day on exposed sites; in cool or shaded conditions, it may mean less. The rule is not a calendar but a condition: the sod should never crisp at the edges.
A simple check is to lift one corner in a hidden spot after a few days. You are not trying to pry the whole lawn up; you are checking for root threads beginning to enter the soil. If the underside is staying soggy, reduce irrigation and improve drainage. If it is dry and shrinking away from seams, increase watering and check for wind exposure or sun scorch. That’s the balancing act.
Hold off on mowing until the sod resists a gentle tug and is rooted enough that a corner does not lift easily. On many lawns that is around 10 to 14 days, but the grass and weather control the timing. When you do mow, use a sharp blade and take no more than one-third of the blade height at once. Cutting too low too soon stresses fresh sod and can tear it from the soil.
One thing many people miss: fertilizer is not a rescue plan. If the base is poor or the sod is drying out, feeding it more nitrogen can push weak top growth without solving root failure. I’d rather see even moisture and patience than a fast green-up that hides trouble.
The mistakes people actually make, and what they cost
The biggest mistake is laying sod on unprepared soil. The consequence is uneven settlement, gaps, and weak rooting. Spend the time on grading and loosening the top 2 to 4 inches before the first strip goes down.
Another common error is lining up all the seams. That creates long, straight joints that split open as the sod dries and shrinks. The better method is to stagger rows like brick, with no four corners meeting in one place.
People also let sod sit in stacks while they “get ready.” Fresh sod is living material, and heat builds inside a stack quickly. The consequence is yellowing, odor, and death at the center of the pile. Keep it shaded, unstack what you can install immediately, and work in the order it was delivered. No dawdling.
Overwatering right after installation is another trap. The sod needs water, but if the soil turns to mud, the pieces can slide, the roots can suffocate, and low spots form. The alternative is thorough, even watering that moistens the soil several inches deep without standing puddles.
The last mistake I see often is mowing too soon or too short. New sod has shallow roots at first, and aggressive mowing can tug it loose. Wait until it is anchored, then keep the first cut gentle.
When should you stop and change the plan?
You should stop and change the plan when the site conditions make ordinary sod installation a poor tool. This is the part people skip, and it is where the expensive mistakes happen.
Water stands on the site for more than a few hours after rain: That means drainage is inadequate — do not lay sod until the grade is corrected or the drainage path is fixed.
The soil is hard as concrete or full of construction debris: That means the root zone is not ready — remove the debris and loosen or replace the top layer before installing.
The slope is steep enough that the soil slides when raked: That means the surface will not hold sod reliably — install with erosion control measures or ask for site grading first.
The area is mostly deep shade under dense trees or structures: That means turf may thin out or struggle to stay dense — choose a shade-tolerant grass only if the species is suited, and accept that some sites are better planted differently.
You cannot water immediately and repeatedly for the first 2 to 3 weeks: That means the sod will dry before it roots — delay the project until watering is reliable.
The sod has been sitting hot and rolled for too long on delivery day: That means the material may already be stressed — install the freshest rolls first, and reject stock that is warm, slimy, or visibly yellowing.
The wrong move in these situations is to push ahead and hope. Sod is unforgiving of bad timing and bad base conditions. If the site needs regrading, drainage work, or a different groundcover entirely, that is not a failure; it is the correct diagnosis.
What changes on slopes, clay soil, and narrow spaces?
Change the setup by controlling runoff, improving surface contact, and cutting smaller pieces where the layout demands it. A basic installation still works on mild slopes, heavier soils, and tight side yards, but only if you adjust the details.
On slopes, lay the sod across the slope when possible, not straight up and down. That helps resist slipping while the roots establish. Pinning with sod staples can help on steeper areas, but use them only where needed so you do not create extra punctures and trip points. If the grade is severe, ask a landscape professional whether terracing or erosion control is the better first step.
On clay soil, the issue is usually drainage and compaction. Loosening the top layer matters even more, but avoid working clay when it is wet enough to smear. If you can roll a ribbon of soil in your hand, it is probably too wet to work. Wait until it crumbles, then prepare the surface and water lightly after the sod is down. For clay soil guidance, the USDA NRCS offers useful soil basics.
In narrow spaces, the trick is planning the cuts before you start. Precut strips for fence lines, utility edges, and tight corners save time and reduce waste. Place the full-width pieces first, then fill the small spaces with trimmed sections. That keeps the layout stable and avoids tiny slivers that dry out quickly.
For cost and material planning, compare common sod types before you order:
| Sod type | Typical use | Approx. delivered cost per sq ft | Notes |
|---|---|---|---|
| Kentucky bluegrass blend | Cool-season lawns | $0.30–$0.60 | Good color, slower establishment |
| Tall fescue | Cool-season lawns | $0.35–$0.70 | Stronger heat tolerance |
| Bermudagrass | Warm-season lawns | $0.25–$0.55 | Fast spreading, sun-loving |
| Zoysiagrass | Warm-season lawns | $0.45–$0.90 | Dense turf, slower to establish |
If you are estimating the job, a typical pallet covers roughly 400 to 500 square feet, though suppliers vary. Measure first, add a little extra for cuts and waste, and ask the seller whether delivery is priced by pallet or by square foot. For regional pricing and installation considerations, your local extension office or garden center is a better guide than a national average.
What changes most is not the sod itself but the discipline around it. The lawn succeeds when the base is right, the seams are tight, and the watering is steady. That is the whole job, whether the yard is 200 square feet or 2,000.